Insulating a roof space

Insulating a roof

I seem to have gone through a pattern of insulating roof space’s the last couple months, not something I’m keen on doing but it was for some of my regulars.

So I thought I would write a little article about insulation especially for a loft/attic space to help you out.

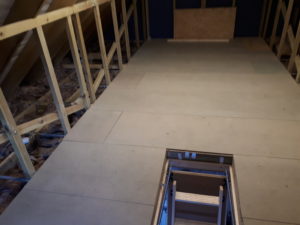
The guidelines haven’t changed much the last few years but a good amount of insulation to have is 270mm thick and this is what the EPC assessors will be looking for if you’re trying to get your rating up to let a property.

“Remember from April 2018 the EPC rating has to be Grade E or higher for any new tenancy agreements.”

But to be honest they do everything in increments of 100mm thick now so you will probably end up with 300mm anyway.

Standard Fibreglass insulation in roof space.

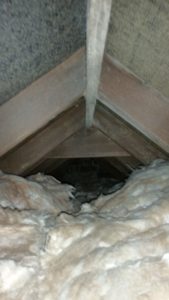
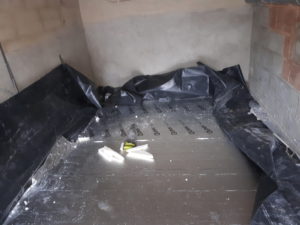
There is no real easy way of doing this job, its horrible stuff to work with. I find doing it in the winter months is best as its cooler in the attic, obviously not a good idea to work in an attic in the summer time as its way to hot especially if you are wearing all the PPE. As  minimum with this stuff I wear full overalls, mask, hat and gloves, also a head torch for the dark corners.

Loft insulation is relatively easy stuff to work with a good Sharpe Stanley knife is more than capable enough to cut it. Oddly enough the 200mm thick insulation is easier to cut then the 100mm, I find I always end up tearing the 100mm to get it to separate.`

I have done a lot of shitty old jobs over the years, so I seem to be able to switch off from feeling really uncomfortable and just crack on till the job is done. However for newbies just getting into this world of prolonged hard jobs, I have a few tips.

  1. Break the job up into small tasks, so get a certain area covered, then have a breath of fresh air, then start again.
  2. Have targets “I want to get that area and that area done by break time”
  3. Don’t waste a trip, so if you need to go down and get something like a saw, bring something else that you may need later up with you on your return.
  4. If you’re on your own I have mentioned this before in my “tips for beginners in construction” post, but I have an audio playing from my phone through the headphones. I love personal development audios and business development so when doing these long hard tasks to help you switch of have a listen to one of these and you will be surprised how much more you can do. The worst thing is to start thinking about how tired you are or how hot it is, the trick is to deter your mind onto other things, the reason I also love the audios is because I feel like I’m learning while earning which is great..

When doing a loft the things you will find hard is the uncomfortable working conditions as I said if your sensible you will have all the overalls and PPE on which in a small roof space is horrible and when you start moving and cutting the insulation you start to get itchy face and arms and that is horrible you will also get really hot just because of the nature of the work and environment, with this type of task I don’t mess around I go up and do the job until its done only stopping for fluids when required I can’t stand taking the mask and hat of every time and having to face putting back on the insulation covered overalls. I also get more covered with the insulation when I’m taking the overalls off so I keep this to a minimum.

This is a roof space I had just insulated and boarded out.

I also find having knee pads on invaluable, roof spaces are usually low so you spend a hell of a lot of time either bent double or on your knees so knee pads are a must and it means you can feel stable while working on the task at hand and not thinking about the pain in your legs. Also an old bricklaying tutor of mine would really get mad with us if he ever saw us working on are knees he would always say if you wanted to last in the job don’t work of your knees and my yoga teacher always says nurse your knees. So basically “look after them”.

There are loads of different types of insulation to work with, the standard fibreglass which we all know well. PIR board which you would probably know as celotex but that’s just the make there are loads like it now. There is also now a space quilt so it has a silver finish that is being used a lot in roof spaces on the rafters. Polystyrene like the stuff they use for packaging and the list goes on some more environmentally friendly versions are sheep’s wool and hemp insulation which are good alternatives, they are more expensive but are sustainable.

Foil faced PIR board. I have just installed this in a floor, ready to lay the chipboard flooring over.

The PIR board is the most used in general building duties nowadays due to the easy handling plus the great thermal ratings its achieves at the relatively small thicknesses. However I have heard on a couple of training sessions I have been on recently that when its used retrospectively, so on older properties in floor or between rafters that they are very inefficient due to the twist and turns of the older timber, so actually it might not be filling in between the wood work as much as we would of liked. I think on newer work it’s a good product but alternatives should be looked at on the older properties.

Fibreglass insulation I installed between rafters, this was the Rockwool acoustic type which reduces noise and is fire retardant.

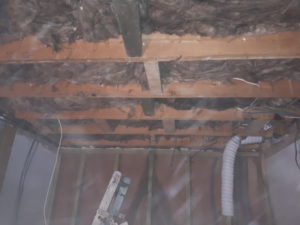
The Rockwool slab as mentioned on my products page is a good alternative it has a good thermal and acoustic rating and it’s easier to fill the spaces between the woodwork as it can be pushed in places more freely.

I have used both now a lot and to be honest I seem to react badly to the PIR board even wearing all the PPE the fibres just really don’t agree with me and I feel shitty after using the stuff. Whereas the Rockwool type insulation although an irritant on the skin doesn’t make me feel as sniffly as the PIR.

The other product I have heard a lot about recently is one called Hybris. A quote from the spec  is as follows:

 “It’s a reflective insulation product for timber frame or masonry walls, pitched roofs or ceiling applications. Based on a honeycomb structure made of shaped polyethylene foams glued to aluminium coated polyethylene foils. High thermal performance is provided by a special structure composed of a large number of low emissivity cavities, protected from dust and excessive air movement. Moreover, the low emissivity external films provide additional thermal resistance, when associated with air cavities.

Hybris insulation, showing honeycomb structure

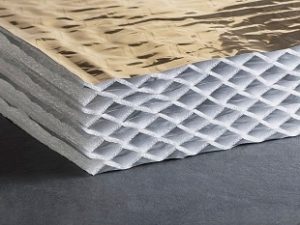
I know a lot of trades that deal with insulation recommend this product, due to the fact there is no dust particles created when cutting the stuff and it is easy install, also its cut slightly larger than required, which will fill in the gaps on twisted timbers, so this is a product to look out for and one that I will try and install on my next project.

Hopefully I have motivated you to get your loft space up to spec and bring your carbon footprint down and also a bit more knowledge on different types of insulation.

Thanks for reading.

Toby.

Converting an outbuilding to become a utililty room!

Outhouse before I converted it with old corrugated plastic roof

The next project I undertook, which is definitely worth posting about is an old disused brick outhouse.

It was in a state of disrepair, the last tenants had used it as a dumping ground the roof had holes in it and it was just full of stuff.

Used as a dumping ground

This was an interesting one as it probably wouldn’t off been made use of if the electrician that had carried out an electrical test on the property (currently being used as a student property) had not failed it on the basis they were not allowed the utility to be shared with a shower, so basically they had electrical appliances such as tumble dryer and washing machine in very close proximity to the shower pod.

So I was asked to make the structure good and turn it into a new utility.

First job was to clear it out and see what we were dealing with, now unfortunately the landlord did not want us to do anything with the concrete floor so we just made it good and used garage floor paint on it which helps to reduce damp coming up through. Ideally I would liked to off had the old floor up and at least installed a membrane and new concrete but that wasn’t an option.

Roof off

The roof had to completely come off. The landlord was really keen for us to make sure this was a solid structure and I found out why later on. (Basically he said one of the old tenants “ drunk as a skunk” climbed out his bedroom window and walked out straight onto this old roof and fell through.) So obviously he was keen to make sure if it did happen again no one would be falling through..

New timbers and rubber membrane for roof

New 4 x 2” timbers were installed, an 18mm osb board laid down and fixed firmly then I used a single ply membrane over it. This was great value all in about £400 and it came with a full kit, which consisted of the membrane, all the adhesives, and trims, also all the hand tools required for it and it was a piece of cake to install. The other hard part was to try and seal it into the existing roof because as you can see its not in great condition so I carried out some minor repairs then tucked our new membrane up under the old felt roof.

Belt and braces, damp proofing and air vent ready for tumble dryer

The brickwork was in pretty good condition apart from a few course up under the roof which was easily repaired, I went belt and braces and coated up the first few courses of brick and the corner of the concrete floor with black jack which is like a damp proof paint used a lot of time when dealing with areas underground or in this sort of situation.

The walls were solid 9” on the front elevation and where the door opening was but  single skin on the side elevation (Neighbours side), we had to batten off and insulate it all but I decided to build a separate stud wall of the single brick elevation as sometimes drilling lots of holes to fix battens can do more damage than good. So after studding and insulating we boarded the ceiling and walls

battening and stud work off existing wall

Before this though the first fix plumbing and electrics were required, for this we were doing a proper utility area with worktop and kitchen sink, so a fair bit of plumbing required and a couple sockets with a rated bathroom light and extractor. The extractor was slightly fiddly as we wanted to tie it in with the bathroom next door, so the electrician used a fan that would work for both the areas and I vented it through the new utility.

Then plastering and painting carried out.

New UPVC door

After that had all dried the easy bits 2nd fix plumbing and electrics and worktop.  The only other bit was getting the new UPVC door in. I was worried initially about height as it was slightly lower than usual, also there was a soil pipe running up the side that could of thrown the door out and the floor levels were slightly different from the grand outside to the utility. But I was able to sink the floor down a bit after doing some chopping of the old floor and it made it work better so there was barley any upstand on the threshold of the new door. I then boxed in all the old pipes and new with UPVC boards, I also opted to use UPVC for the skirting boards to finish the area completely I thought this to be a lot more hard wearing for possibly quite a wet area. It also gave a really nice finish once cleaned up and it’s so easy to work with.

tumble dryer, washing machine, sink and worktop

I then wheeled in the existing tumble dryer and washing machine connected it and tested it and now everyone is happy including the electrician. I have to say the finish was so good it let the rest of the house down.

So another good example of how you can make use of old dilapidated outhouse on the backs of your properties.

Painted floor and UPVC boxing in

If you have not already read my post “converting an outhouse” for more on outhouse conversions.

Thanks for reading,

Toby  🙂

Getting quotes from builders

So you need work doing and have to get quotes in.

“GET AT LEAST 3 QUOTES IN”.

I say this until I am blue in the face to people. Three quotes will give you a good idea of cost, it gives you chance to meet the person that will do the work and also it gives you a figure in mind to work to. Don’t go moaning to everyone about a rouge builder if you took the first quote you were given and couldn’t be bothered to search around, there is no excuse.  On that subject don’t get someone to do the work that has knocked on your door and will do something cheap for cash….They are not proper qualified tradesmen. It’s different if you see someone carrying out work at a neighbours and the neighbour rates the person and you can see their work first hand, its fine to go up to them and ask them to quote but don’t accept work to be carried out by someone that has literally knocked on the door to sell their services this is a “no go”.

Going back to getting 3 quotes in, I even say this to people when I am out pricing.

 I carry out a pretty broad spectrum of work but inevitably there will be someone that specialises in a certain area that may be able to do a certain job quicker than me or even be able to get the same materials only cheaper. I had a job recently were the painter I use could not match the quote we had from another. As this chap offered a guarantee and had work I could look at to verify he was good I went with him. (My usual painter even said go with him at that price)

What is worth noting with quotes, Is they are not all going to come in exactly the same hopefully you have a good spread. It’s important however to make sure each builder is pricing  for the same work, Don’t tell one to do it one way and the other to do it a different way. It will inevitably be different.

When the quotes come back ensure the quote/estimate has everything written down that you want doing don’t assume because you spoke about it when they were looking at the job that it is on their. These things need clarifying from the outset.

When you have confirmed everything is included that was expected then you can look through them in more detail. If they all come back the same it’s about picking the guy that has good references and if possible can show you some of their work also someone you will get on with. This is especially important if they are going to be in and out of your house for a month.

This is not normally the case what you generally find is you will get back 3 prices, low-medium and high.

Standard advice is “go for the middle.” But what people generally do is just go for the cheapest. There is nothing wrong with this but just do your due diligence, make sure the person has been checked out (Like I did above) ideally see their work and if possible speak to a recent customer. Also weigh up the pros and cons, the middle price or even the higher price maybe from someone that has been highly recommended and known to use good quality materials and do a thorough job they also may have an in depth knowledge of the works and can offer more advice throughout rather then just doing the basics.  So you have to weigh up what your ideal will be, at the same time the type of job you want doing and finish.

So to summarise:

-YOU NEED 3 QUOTES!

-Don’t accept a doorstep salesman to carry out work for cash because it sounds like a good deal,

“IT WILL NOT BE”.

-Even after the 3 quotes, do your due diligence and check the builder/tradesmen out, ask around, check references and if possible look at previous jobs they have carried out.

If you follow the steps above you will not be one of the people that end up on TV complaining about a rouge builder.

For more help and advice on hiring a builder read my post “Top tips on choosing a builder”

Thanks for reading

Toby 🙂

Converting an outbuilding

Newly converted outbuilding

A lot of people are keen to convert a garage or outbuilding/outhouse so I thought I would write down some information and handy tips for you before you get started.

Planning

Newly converted outbuilding internal

If converting an existing out building, planning will usually be required alongside building regulations. The planning departments are normally really helpful so a quick call to them to ask their advice will confirm this. Although I under took a refurb recently and as the outhouse was already an office with kitchen area and toilet planning was not required.

Structure

The next thing to look into is the structural stability of the building. Just because its standing fine now doesn’t mean that by the time you have added stud walls, bathroom, kitchen that the structure will be able to maintain its position.

A trial hole and I am measuring the depth of the concrete footing.

What I recommend is digging a trial hole in front of the exterior wall and dig down until you can find the footings. I would then ask a structural engineer to do some calculations to make sure your plans are achievable using the existing structure as it stands. Usually it won’t be a problem but if it’s potentially going from an outbuilding built for storage to a habitable space, it needs checking and rather now then later down the line when it could really cost you.

Once you have had the calculations back then it can go one of 2 ways the footings are adequate meaning you can go ahead with your plans subject to planning. Or the footings are not adequate meaning you will now have to work out the best course of action. A couple examples of what can be done for inadequate footing:

Underpinning

This is when the existing footing is undermined in sections and additional concrete poured underneath to make the existing footings more substantial. Although there are other methods of underpinning now this is the more standard way of doing it. However if you have a large area to underpin then possibly other methods may work out better value. Another type of underpinning is:

Screw pile and brackets.

This is where a metal tube is screwed into the ground to whatever depth is required (usually to hard ground and then some), then a bracket fixed to the tube. This metal bracket then picks up the bottom of the footing. This would need to be done at intervals across the entire footing that needs underpinning.

Costs would need to be compared and the gains calculated over the entire project as to whether it is cost effective to underpin or to simply demolish the existing building and rebuild from scratch. Although it sounds like a big task in these circumstance sometimes its quicker and easier to start again.

Once this has been worked out and if your able to refurbish the existing building then it’s all plain sailing from here on out. Standard building regulations apply.

Typically outbuilding’s would either be solid 9 inch brick work or a standard 4” I will discuss this later on but with regards to preparing this type of wall construction then damp proofing will be required.

Damp proofing

Insulation over the top of the new concrete slab. With the polythene membrane coming up the sides ensuring damp does not get through into the new floor.

Damp proofing is usually quite a bit of work, as usually the existing floor would off almost certainly not had a Damp proof membrane installed (DPM) so the floor would need taking up and a new insulated concrete or suspended timber floor need installing. Also a Damp proof course (DPC) will usually need to be installed and alongside this tanking is needed on the internal wall, before it’s boarded or plastered.

Tanking and Injecting

Injecting a DPC is when an existing wall doesn’t have a water impermeable layer to prevent the moisture tracking up through the wall, this is usually on older properties and as such an outbuilding will probably be the same.

Injecting internal wall

A way of installing a DPC retrospectively is by injecting a chemical into the wall at intervals along the length at the same height (Usually 150mm above floor level externally and floor level internally).

This spreads out and forms a barrier to prevent the water passing up through the wall.

Tanking usually goes hand in hand with injecting. This is when plaster is taken off the internal wall up to 1.3m from floor level and a waterproof sand and cement mix applied to the area. Once dry this can then be plastered over or plaster boarded.

This prevents any moisture working its way through the wall substrate and coming out into the internal room.

Insulating

I have assumed the walls are either a cavity wall or solid 9 inch. Cavity wall is the standard wall construction we see today, where there is a inner leaf and outer leaf with a gap (cavity between the 2) this cavity is usually filled with insulation if it’s an older building this usually won’t be filled that’s where you get these companies going around filling the cavity with insulation.  If it’s a solid wall then there is no cavity just 9 inches of brick work.

Battening the wall.

If it is solid then it would be worth considering whether you want to batten off the wall and install a pir board in between the batten and board over or board over the battens with an insulated backed plasterboard. This will help with the u value and as solid walls can be susceptible to condensation and damp it’s a great way of preventing this problem while keeping the area warm.  Also you could just dot and dab the insulated backed board direct to the walls which is a good cheap alternative, however if you have used a tanking slurry beforehand check that you can use the plasterboard adhesive straight to the tanking solution as some tanking products don’t allow this .

If it happens to be a single skin wall (single brick/block wall) then you will definitely need to build an internal stud wall, insulate between the stud and over the stud to get better u-values.

Again going with the insulation theme, consider what you will be doing with the ceiling, will you be keeping it vaulted to maximise the feel of space, or keep it standard. If height is not an issue then keeping it standard is no problem and the use of fibreglass insulation will be adequate, but if you are vaulting the ceiling space (opening it up to the underside of the roof) then insulation will have to be installed between the rafters and over the rafters, again the insulated backed plasterboard is a good alternative here as the board and insulation go up in one hit.

Ventilation

The other thing to consider is the ventilation.

As standard now I would recommend the following, bathroom extractor:  opt for a constant trickle with a boost mode.  When the light is switched on the extractor boosts and after a set time the boost stops and carries on with a constant trickle.

The second is an kitchen extractor, one over the kitchen hob is good, but I feel its only as good as the operator and from experience this isn’t usually the main concern of the tenant. So it may not even be used.

I would as well as the cooker hood install a constant trickle extractor with a humidity stat. What this will do additionally is kick in when extra humidity is detected. I like this because it takes it out of the hands of the operator and sorts itself out. Which means all the moisture laden air is removed,  thus keeping condensation and mould down to a minimum if at all.

The other important thing to keep in is ensure any new windows have a trickle vent installed, this ensures fresh air is constantly coming into the property and means you don’t have to be concerned when you don’t see the windows open at all. You can also retrospectively install trickle vents I do it all the time for landlords that have had enough of mould build up in their rentals.

Lighting

The rest is down to design and personal touch but LED down lighters are a great tool in lighting up an otherwise dark space. Consider having different circuits for the lighting, broken up into the different areas. So if it’s all open plan the kitchen, living room, entrance hall, wall lights ensure these can be switched on and off separately. This is a good way of keeping electricity costs down and also highlights the separate spaces giving it a warmer feel.

Sockets

Also what I found while doing my annex was that the sockets with the USB ports were really handy. I didn’t put them everywhere just one in the living room and one by the bed. Very handy and still pretty new so a bit of a luxury for the tenants and give that wow factor, but actually they don’t cost the earth.

Bathroom

Shower pod example

You usually have a limited space for a bathroom in an outbuilding. Wet rooms are great but a fair bit of work. I do like the new shower pods that are available and costs for these have come down considerably and the great thing with pods is that they are practically maintenance free unlike the traditional tiles and shower tray. Also consider installing an over mirror light with shaver point and shelf under the mirror or go for a cabinet with this included. These work well with electric tooth brushes and are a handy place to have them charging up rather than trailing leads on the floor (like I have at my house). Again a bit of a luxury but they give a bit of a wow factor. Check out my post for small bathroom ideas and tips for more help in this area.

Summary

Hopefully my main points above will get you started on your project, obviously design and layout are subjects on their own, my main tip is try and incorporate all the space don’t leave anything out, as with all outbuilding’s, space is a premium so don’t waste it. If you’re like me I like to design as the space takes shape whereas others can see it before it’s done. Work to your strengths and don’t be afraid to ask people’s opinions.

Good luck with your projects and be sure to look at my other posts for further help and advice.

Toby 🙂

Why choose construction?

Construction work is hard.

No easier way to say it. Its long hours (you seem to do more hours than most), you are out in all weathers, you are physically and mentally tired at the end of each day and you will find yourself saying “what the hell am I doing this for”. It gets even worst if you run a company.

However every builder/construction worker you speak to will say the same things as above but they are still in the job I would bet. OK some may feel they have to but a lot will choose to.

Me loading up concrete. You can not see it in this picture but I was going up and down a really steep drive.

Its enjoyable work, there’s always good people to work alongside and nothing can beat the satisfaction you have when  a job is completed especially if that job was  particularly challenging. You get to test yourself physically and mentally on a daily basis so if you are a fitness nut this is the industry for you.

It will take time to get use to this type of work but you will soon get into it once you have a bit of conditioning. I still now enjoy the really physical jobs. I feel like I deserve that extra pudding in the evening or beer out in the garden and I still feel like I have achieved more doing a really hard day on site then I do if I have a long hard day in the office.

The money is really good in construction now for all the trades, plumbers and electricians use to be on a lot higher rates but I have found now that bricklayers, plasterers, dry liners and roofers are on equally good money and in some cases even more.

In fact the other day I had an email from a recruitment agency updating me with the trades they have available for that week and on the list of rates, bricklayers were at the top above plumbers and electricians.

Also there are so many opportunities in the construction industry now, with so many roles it is unlimited to where you can go. From labourers/trades on site to project management, finance, sales, surveying, design and so on.

I would always recommend getting on a site for some work experience to get a feel for it, start labouring and by doing this role you will get to see what the trades get up to and see if it’s something you can get on with all the while earning some money doing it.

All in all it’s an amazing industry to be in and it’s not like the old days where once you had done your trade that was it for you, now the possibilities are endless.

Good luck and believe me you won’t regret choosing construction as your career.

Me beating 5000 applicant to get to the final 8 in Britain’s top tradesperson.

Quality trellis fencing

Trellis fencing reccomendation

With the gardening season coming up I thought I would do a post of trellis fencing. I have put some of this trellis up at my own property and I love it, not only does it look good is great quality. The joints are Mortise and Tenon, so don’t come away at the joints like the cheaper alternatives. They come in a variety of sizes, the largest is 1.8 x 1.8m and this will cost around £40. I actually used mine as screening leading up to my porch area. The gaps are small enough to maintain the privacy but don’t block out the light. If you want more information on the trellis and size options, click on the picture below to be taken to the Ebay page that sells them