Top tips for decorating your room

The best tips for painting a room or property

With the current situation, people are finding themselves at home a lot more and looking at jobs to do.

A great way to freshen up your room or property is to give it a coat of paint. So below are some tips to decorating..

1) Firstly I have a good friend who is a decorator so for him straight of the bat lets say my first tip is to employ a professional to do the awkward bits. Now if your like me I can roller the walls all day long and it look ok but my cutting in is not all that. You could ask the painter to do all the cutting in for you then you do the rolling yourself!

2) If you decide to do it all. preparation is key. My wife gets sick of waiting for me to do things around the house, we have had many an argument when she decides to take the ball by the horns and just slap some paint on the walls. This then ends up on the carpet, the windows (everywhere). So get everything covered up. I end up with more on me and the dust sheets then on the wall so this has saved me a few times. I like to use masking tape to stick down by the skirting boards. Also there is great products out there at the minute where its a plastic that sticks to the carpet or laminate, Really easy to use and can then be peeled up and thrown away when finished with not so much as a spec left behind. I find with the old hessian type sheets they can often let the paint weep through.

3) Carrying on with preparation in mind, the walls will need preparing first, So by this I mean fill holes, stain block any strange stains that have appeared. Then sand down any filling also sand down the woodwork. The wood work needs a rub over with sand paper to give a key to the new paint.

4) Once you have done this give the area a clean up get up all the dust you have just made from sanding down everything. This prevents the dirt getting on the walls when painting.

5) Give the ceiling a paint. Get the ceiling complete first before you move on. Rolling will spray fine specks of paint so by doing the ceiling first eliminates the chance of if flicking over the walls.

6) Cut in all the edges so where ever it abuts a wall, ceiling or skirting board. use any size brush that you rare comfortable with a 2″ is good for the finer work a 4″ is good for the wall abutments.

7) At this stage use a decorators caulk and caulk in all the edges. this gives the edges a nice uniform finish and gives your something to cut into for your final coat. Also use some light sandpaper and give the walls a really light rub. this just take of any drips or bits of dirt from the first coat.

8) What I would do next if give the wood work a once over either with the undercoat or if you are using satin then the first coat of this.

9) Usually walls and ceilings take 2 coats to get it looking good. But this will change if you have a very dark colour. Do a cut in then a roller. Give it time to dry (Touch test) then cut in and roller again. Leave it to dry then see what it looks like if it looks solid then all good. Otherwise repeat.

10) Once the walls are looking good do the final gloss or satin wood on the wood work. Gloss is harder wearing but requires more work. For a quick freshen up most people use a satin wood. Its not as hard wearing as gloss but the upside is you can go over it with less prep work so can keep it looking fresh.

11) If you take anything from this take this tip away get a decent roller/sleeve. A 12″ long pile is best. They usually cost around £10 and are worth it. With this you will need a roller frame and a scuttle. But these beat the pants of the DIY ones where you use the throw away tray. Once they have the paint deep in them you will minimise the amount you get paint and it spreads the paint better on the walls.

12) When rolling be sure not to leave the roller marks try and leave it looking even with not scars. This also applies to the brush if you leave brush marks they always stand out try and leave it with minimal marks.

13) There are loads of makes of paint now all I would say is maybe think about where the trades go and take pointers from them. Trade paint is usually the better stuff and nowadays any colour can be mixed.

Hope this helps you and if there is anything else you would like tips on leave comments in the boxes below.

Happy painting..

Toby
Dispute with builder over bill.

Who’s at fault? 

A situation came to light recently that I thought I would share, so others can learn from. I received a phone call from a chap that I know and he was explaining his reason to withhold funds for work he had completed by a person whom we both knew and where friends with. The chap was keen to let me know his side of the storey.

The chap had a leak in his shower and wanted it remedied whilst he was away on holiday. This was agreed with said builder. During completion of the work the builder found that the job to be more than replacing parts and that a full redo of the shower enclosure was required. The builder took his initiative and continued and completed works being friends with the customer he thought this would be no problem…..

 This sounds all well and good and using your initiative is usually seen as a good thing. But first mistake made, the builder must confirm with the customer that they are happy to continue if works are different to what they expect. Not to mention the additional costs that they may have not factored in. An extra tip here, get it in writing. Most people on holiday look at their emails just to confirm what was said. Make sure a new price for works is confirmed.

The customer supplied the materials to save money. Unfortunately this can mean that the materials purchased are not suitable. In this situation this was the case. The builder took his own initiative again and replaced for appropriate parts, thus more costs. Second mistake- I understand the customer wanting to save money but sometimes it really is best to let the professional use the materials they are used to and can guarantee. The amount of times I have had to use some ex-showroom, it ends up being a complete waste of time and the finish is never great. What also should of happened here is that the builder should have spoken to the customer first to recommend the types of materials required for the particular job, obviously the customer still has the option to go out and source/ purchase the materials still, but at least then everyone is happy. Also the builder should have confirmed what he was replacing the materials with and if the customer was happy for him to proceed.

The builder then finished the work give or take a few bits while the chap was still on holiday so he sent him an invoice and updated him that all works were complete.

The customer returned from holiday expecting to be finished and the bits the builder hadn’t quite finished yet where noticed straight away which made the customer unhappy with the finish.  So here the customer has the invoice in hand, a lot more then he thought and there is a big snagging list.

From the builders point of view it was a couple small things to finish but I think the issue was made bigger because the builder promised to have it all finished by said date.

The builder had arranged a revisit to go through the snagging but unfortunately cancelled the morning of, this really got the customers back up. It spiralled quickly after this and ended in the customer saying he would not be paying for the additional works and the builder saying he would take him to court..

So letting it all settle in I asked the chap a question.

Obviously my first question was “what was the original quote” customers reply “I didn’t ask for one”

Long pause……….. That was a massive mistake I replied. The customer had one idea of what things might cost and the builder has a completely different idea. The builder then completed the job ready for when the customer returned home or so he had thought.

He  went on to tell me what he had not completed, how the work appeared unfinished and on a whole not to a very good standard.

I did say I was very surprised as I know the builder well and there are many things I would say about him but usually his standard was very good.

He said he asked the builder to return to rectify the faults and finish what he said he would, the builder booked into return however the morning off text to say he couldn’t make it.

I can see both points of view here ‘in the builders eyes’ he had done a cracking job, he had completely sorted the ongoing problem the rotten boards were gone, new tile boards up, the best materials used that money can buy, all done before the customer got home couple small jobs to finish (cracking!). What the customer saw was quite different. A surprisingly large invoice for the works and a list of jobs still to be finished.

Who is really at fault here?

The answer is they both are to a degree. The builder should of kept the customer updated throughout and regardless that they were on holiday I would be sending pictures of updates as the job progressed with an updated price for the additional works, If they said they were not happy I would of held off doing the job until they were back to discuss face to face. I also would not of sent an invoice in until all works were complete and the customer was happy.

The customer should have asked for a quote first and not assumed a figure that they had dreamt up. Also although it makes sense to have works like this done while you are away on holiday and the dream is that you come back it’s all shiny and brand new, I can tell you this is not always the case. Problems always crop up and really the customer needs to be there in my opinion to discuss the job with throughout.

In the end I believe the customer did pay but only an amount that he had in mind for the project, which meant the builder did lose out. I do feel for both parties but I do think this could all of easily been avoided altogether.

So hopefully what you get from this article is

-Even with people you know don’t assume.

-Always have things written down and agreed.

-If you are away asked for updates & Photos (WhatsApp) is free and you can send a ton of pictures.

-GET A QUOTE (refer to my getting quotes article)

Hope you have enjoyed the article.

Don’t forget to go over my other articles; there are gems of free advice throughout…

Toby

Insulating a roof space

Insulating a roof

I seem to have gone through a pattern of insulating roof space’s the last couple months, not something I’m keen on doing but it was for some of my regulars.

So I thought I would write a little article about insulation especially for a loft/attic space to help you out.

The guidelines haven’t changed much the last few years but a good amount of insulation to have is 270mm thick and this is what the EPC assessors will be looking for if you’re trying to get your rating up to let a property.

“Remember from April 2018 the EPC rating has to be Grade E or higher for any new tenancy agreements.”

But to be honest they do everything in increments of 100mm thick now so you will probably end up with 300mm anyway.

Standard Fibreglass insulation in roof space.

There is no real easy way of doing this job, its horrible stuff to work with. I find doing it in the winter months is best as its cooler in the attic, obviously not a good idea to work in an attic in the summer time as its way to hot especially if you are wearing all the PPE. As  minimum with this stuff I wear full overalls, mask, hat and gloves, also a head torch for the dark corners.

Loft insulation is relatively easy stuff to work with a good Sharpe Stanley knife is more than capable enough to cut it. Oddly enough the 200mm thick insulation is easier to cut then the 100mm, I find I always end up tearing the 100mm to get it to separate.`

I have done a lot of shitty old jobs over the years, so I seem to be able to switch off from feeling really uncomfortable and just crack on till the job is done. However for newbies just getting into this world of prolonged hard jobs, I have a few tips.

  1. Break the job up into small tasks, so get a certain area covered, then have a breath of fresh air, then start again.
  2. Have targets “I want to get that area and that area done by break time”
  3. Don’t waste a trip, so if you need to go down and get something like a saw, bring something else that you may need later up with you on your return.
  4. If you’re on your own I have mentioned this before in my “tips for beginners in construction” post, but I have an audio playing from my phone through the headphones. I love personal development audios and business development so when doing these long hard tasks to help you switch of have a listen to one of these and you will be surprised how much more you can do. The worst thing is to start thinking about how tired you are or how hot it is, the trick is to deter your mind onto other things, the reason I also love the audios is because I feel like I’m learning while earning which is great..

When doing a loft the things you will find hard is the uncomfortable working conditions as I said if your sensible you will have all the overalls and PPE on which in a small roof space is horrible and when you start moving and cutting the insulation you start to get itchy face and arms and that is horrible you will also get really hot just because of the nature of the work and environment, with this type of task I don’t mess around I go up and do the job until its done only stopping for fluids when required I can’t stand taking the mask and hat of every time and having to face putting back on the insulation covered overalls. I also get more covered with the insulation when I’m taking the overalls off so I keep this to a minimum.

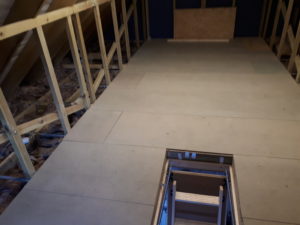
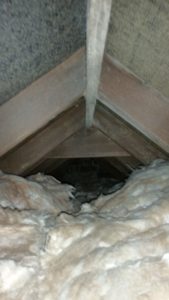
This is a roof space I had just insulated and boarded out.

I also find having knee pads on invaluable, roof spaces are usually low so you spend a hell of a lot of time either bent double or on your knees so knee pads are a must and it means you can feel stable while working on the task at hand and not thinking about the pain in your legs. Also an old bricklaying tutor of mine would really get mad with us if he ever saw us working on are knees he would always say if you wanted to last in the job don’t work of your knees and my yoga teacher always says nurse your knees. So basically “look after them”.

There are loads of different types of insulation to work with, the standard fibreglass which we all know well. PIR board which you would probably know as celotex but that’s just the make there are loads like it now. There is also now a space quilt so it has a silver finish that is being used a lot in roof spaces on the rafters. Polystyrene like the stuff they use for packaging and the list goes on some more environmentally friendly versions are sheep’s wool and hemp insulation which are good alternatives, they are more expensive but are sustainable.

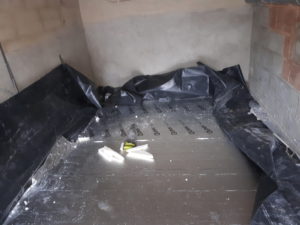
Foil faced PIR board. I have just installed this in a floor, ready to lay the chipboard flooring over.

The PIR board is the most used in general building duties nowadays due to the easy handling plus the great thermal ratings its achieves at the relatively small thicknesses. However I have heard on a couple of training sessions I have been on recently that when its used retrospectively, so on older properties in floor or between rafters that they are very inefficient due to the twist and turns of the older timber, so actually it might not be filling in between the wood work as much as we would of liked. I think on newer work it’s a good product but alternatives should be looked at on the older properties.

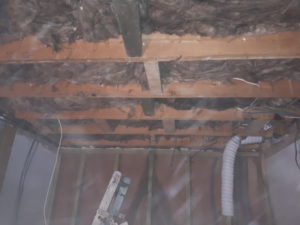
Fibreglass insulation I installed between rafters, this was the Rockwool acoustic type which reduces noise and is fire retardant.

The Rockwool slab as mentioned on my products page is a good alternative it has a good thermal and acoustic rating and it’s easier to fill the spaces between the woodwork as it can be pushed in places more freely.

I have used both now a lot and to be honest I seem to react badly to the PIR board even wearing all the PPE the fibres just really don’t agree with me and I feel shitty after using the stuff. Whereas the Rockwool type insulation although an irritant on the skin doesn’t make me feel as sniffly as the PIR.

The other product I have heard a lot about recently is one called Hybris. A quote from the spec  is as follows:

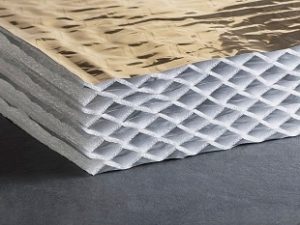
 “It’s a reflective insulation product for timber frame or masonry walls, pitched roofs or ceiling applications. Based on a honeycomb structure made of shaped polyethylene foams glued to aluminium coated polyethylene foils. High thermal performance is provided by a special structure composed of a large number of low emissivity cavities, protected from dust and excessive air movement. Moreover, the low emissivity external films provide additional thermal resistance, when associated with air cavities.

Hybris insulation, showing honeycomb structure

I know a lot of trades that deal with insulation recommend this product, due to the fact there is no dust particles created when cutting the stuff and it is easy install, also its cut slightly larger than required, which will fill in the gaps on twisted timbers, so this is a product to look out for and one that I will try and install on my next project.

Hopefully I have motivated you to get your loft space up to spec and bring your carbon footprint down and also a bit more knowledge on different types of insulation.

Thanks for reading.

Toby.

Why choose construction?

Construction work is hard.

No easier way to say it. Its long hours (you seem to do more hours than most), you are out in all weathers, you are physically and mentally tired at the end of each day and you will find yourself saying “what the hell am I doing this for”. It gets even worst if you run a company.

However every builder/construction worker you speak to will say the same things as above but they are still in the job I would bet. OK some may feel they have to but a lot will choose to.

Me loading up concrete. You can not see it in this picture but I was going up and down a really steep drive.

Its enjoyable work, there’s always good people to work alongside and nothing can beat the satisfaction you have when  a job is completed especially if that job was  particularly challenging. You get to test yourself physically and mentally on a daily basis so if you are a fitness nut this is the industry for you.

It will take time to get use to this type of work but you will soon get into it once you have a bit of conditioning. I still now enjoy the really physical jobs. I feel like I deserve that extra pudding in the evening or beer out in the garden and I still feel like I have achieved more doing a really hard day on site then I do if I have a long hard day in the office.

The money is really good in construction now for all the trades, plumbers and electricians use to be on a lot higher rates but I have found now that bricklayers, plasterers, dry liners and roofers are on equally good money and in some cases even more.

In fact the other day I had an email from a recruitment agency updating me with the trades they have available for that week and on the list of rates, bricklayers were at the top above plumbers and electricians.

Also there are so many opportunities in the construction industry now, with so many roles it is unlimited to where you can go. From labourers/trades on site to project management, finance, sales, surveying, design and so on.

I would always recommend getting on a site for some work experience to get a feel for it, start labouring and by doing this role you will get to see what the trades get up to and see if it’s something you can get on with all the while earning some money doing it.

All in all it’s an amazing industry to be in and it’s not like the old days where once you had done your trade that was it for you, now the possibilities are endless.

Good luck and believe me you won’t regret choosing construction as your career.

Me beating 5000 applicant to get to the final 8 in Britain’s top tradesperson.

Felt Roof tiles/Shingles

Felt roof tiles

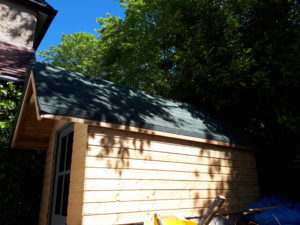
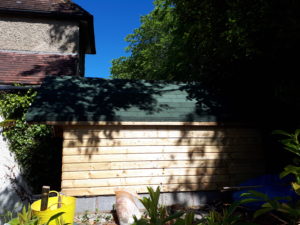
My most recent job was to supply and install some felt roof shingles. It’s not something I have had to do before but the customer was adamant on them so I looked into them in more detail so I could carry out the works.

So I thought I would share my experience and offer some guidance if it’s something you are considering on undertaking.

To start with and as standard for me I searched around for best suppliers. I typically won’t just go to the roofing supplier in the area I have to look around to make sure I am getting the best deal. I then looked into colours, shapes and how to install.

After searching for a supplier I ended up actually going with Wickes. They had them in stock and I could go and pick them up from a local store. The reviews online were really good as well and this is where I found they offer a detailing strip on a roll (more details to follow). Also I found by the time I ordered the product online and paid shipping I would end up paying considerably more.

So Wickes it was.

The customer specified a green square tile. This comes on strips of about 900mm and has about 5 tiles on each strip. These are easily set up and fixed to the roof substrate.

What really helped was that I watched the tutorial video a couple times that the manufacturer in this case “IKO” has created to help the installer. This was very useful and definitely worth a watch and it’s found on youtube: https://www.youtube.com/watch?v=pUSGEmOZMyE

These videos always make it look easy, so I wasn’t expecting it to be so. However I was pleasantly surprised, I was also impressed with how quick they go up and the quality look of the finish.

Work out how much you need

To start with measure the roof to work out quantities. A pack generally covers about 1m2  but always allow a bit more. In the video it shows you how to install the detail strip by using the tiles supplied but to do this you have a lot of wastage. (The detail strip is installed all around the edges of the roof before the felt tiles go up). So I recommend buying the detailing roll which I found Wickes supplied but there was no mention of this product on the Youtube Video.

The measurements for the roof I was working on was 3.6 x 1.2m on per side, for this I needed 5 packs of felt shingles 2 packs of clout nails 6 tubes of roof sealant and just over 1 roll of underlay felt. I also purchased 2 rolls of the detailing strip. This was more than enough for the main bits but if you want to do the ridge as well then you would off needed another roll. However I followed the way they do it on the video by using the individual tiles and in this case it was what was left over from the tiles and the detailing strip.


Process

I won’t go too much into the process of installing as the video is better to watch. So instead a few tips to guide you along the way are below, but watch the video first then read my tips as they will make more sense.

Tip 1) There was a lot of wastage so I decided to do the ridge the way the video shows, by using individual tiles and tacking them down, it takes more time but I was able to use up all the off cuts and it looks a lot more detailed and gives the roof a really nice professional finish. I personally think it looked more like a roof on a house then just a shed.

Tip 2) I stuck the bottom of each tile down which makes it feel more solid and gives me more confidence in strong winds.

Tip 3) I used a staple gun for the initial felt underlay to get it down really nice and snug.

Tip 4) I would definitely recommend a second pair of hands, I had quite an awkward site and I needed someone constantly holding the other end or passing things up.

Tip 5) Try and leave the packs out in the sun if possible, before and during the works. I found it makes the tiles more malleable and prevents the felt from splitting when doing any awkward bits.

Tip 6) Work out exactly the size of clout nails you can use. You don’t want to small and to long will go through the roof ply. I found 13mm worked ok on the bulk of the roof tiles but when we got to areas where the felt was doubled up larger would have been better possibly a 20mm clout.

Tip 7) Use a chalk line it was a great tool to have. I could mark up every few lines to make sure I was staying nice and level on each run of tile strips.

Tip 8) Also get a tool belt you need to nail constantly and it saved me loads of agro just having the clouts in my pouch.

Tip 9) Keep the area clear, you will find there’s bits of felt and plastic wrapping everywhere when you get going. So take some time to bag up the waste throughout the job. This keeps the area safe and means less clearing to do at the end of the job.

Tip 10) Use some packing where the ladder rests against the roof. Especially when its hot the ladder rubbing against the felt can cause marks. So a dust sheet or some sponge rubber keeps the roof protected.

These are my main tips I can think off, but as usual any queries or questions please leave a comment.

This isn’t the cheapest material and if you just want something cheap and cheerful to go with some standard roof felt would suffice. But if you want that wow factor then this is definitely the product to use. I am also very confident after handling the material that it will last a hell of a lot longer than a standard shed felt and an aesthetically pleasing long lasting product for a slightly higher cost is definitely the way to go.

Hopefully this post helps you on your roofing project. As always feel free to message me if you have any queries.

Thanks for reading.

Toby.

Best place to get business insurance

If your setting up in the industry, then you need insurance.

I have used many companies over the years and by far the best i have come across is AXA business insurance. They have many options to consider from basic cover as a sole trader to a large corporations. I set up with an adviser originally to make sure everything was covered and now when i renew i  make any adjustments over the internet.

I have mine for the business and i chose to pay monthly. When it comes to renewal they don’t put the price up for you to have to call to knock them down they give you a fair renewal price from the outset.

Customer service is really good and although i have not had to claim on the insurance i am more then confident that they will be able to deal with any problems that crop up.

Click on the AXA symbol to be redirected to get a quote..


UPVC window maintenance

Windows are always overlooked in a property and never maintained and its so easy to do so and just by annually maintaining them it really can add years onto their life.

Window seals

A tip is to buy some Vaseline and coat up all the seals, these are the bits that are around the window vents they are made out of rubber and will perish really quickly if not kept lubricated so literally get some Vaseline on your finger and rub it all over the seals.

If they are really cracked and are falling apart they can be replaced easily, any window guy will be able to undertake this for you. Also by replacing the seals it will help with the actual seal of the window and reduce the amount of cold air leaking through.

Window Hinges

The hinges on the window vents can either be coated with Vaseline as well or a 3 in 1 oil this is particularly important to remember to do in places like the kitchen and bathroom where there is a lot of moisture and by lubricating the hinge it will prevent the metal going rusty and the hinge unable to work properly.

However do not dismay if your hinges are already in a state the window does not need replacing you can replace the hinges. I would suggest using a window fitter for this as the window vent will need to come out to change them and this can be fiddly, also the hinges come in 2 different thicknesses (stack height)  so this will need to be measured before purchasing the new hinges and sometimes its just easier to leave it to the professional.

Cleaning the frame and glass

It sounds simple but keep the plastic frame clean, its good practice to go over the frames once a year to get all the previous winters crud off. Hot soapy water as standard, but also when I used to fit windows for a window fitting company we used a solvent cleaner to get all the glues and marks of. So for the real stubborn marks I would invest in some of this (check out my products page to purchase) There is also a glass cleaner we use to use that is amazing at getting the glass clean and all the marks of, one of my first jobs as a trainee was to clean all the windows after they had been fitted and what I use to do was clean all the frames with the solvent cleaner then with the same handful of tissue paper spray the window down give is a good wipe down, then get a clean piece of roll and buff it up and it would look amazing..(check out my link for the window spray)

Weep holes

Make sure all the weep holes are clear and running free, over time they get blocked up so a paper clip and a prod about would unblock these.

Broken glass unit

Last but not least the glass. Now I mentioned about cleaning it but what can happen is that the glass unit can break down, this is best illustrated by the glass becoming misty/condensation but in the middle of the glass so between the 2 sections that make up the glass unit. This happens over time as the glass unit breaks down and the argon gas escapes. Again don’t fear the whole window doesn’t need replacing just the glass. Again speak to a window fitter as they will need to come out to measure the glass and find out its thickness then this is usually easily changed over.


Hopefully this gives you a bit more insight into UPVC windows and by carrying out these small tasks will inevitably add years onto the life span, keep energy costs down and make the house look smart.

If you have any questions about upvc windows please comment on the post.

Many thanks for reading.

22 construction tips for beginners

So you have just got into a place and you want to start doing jobs yourself. Maybe you’re usually in the office so the thought of spending your summer evenings building patios or ripping down walls gets you excited. If that’s the case read on for my construction tips for beginners.

 Tip 1) Always get advice from a builder before carrying out any works.

Tip 2) Start small and work your way up to the bigger jobs (So don’t go all guns blazing ripping out a bathroom if you can’t put one back) get used to working with tools so start on something small like hanging a door or putting some stud work up.

Tip 3) Wear the right safety equipment, steel toe caps as standard with a reinforced mid sole. Gloves, hard hat goggles, face mask, ear protection. Decide what is required when you are doing the job although the list above is pretty standard on construction sites now.

Tip 4) Start doing some labouring for a builder on the weekends this will help you gain confidence and you can learn a lot from watching others. Most of the trades start in some form of labouring job before they get into their chosen trade.

Tip 5) Your house is a great place to learn so try your hand at all the different jobs don’t just stick to one or two

Tip 6) Check YouTube out it has a how to guide for everything.

Tip 7) Sign yourself up to evening classes. local colleges run part time construction courses for most of the trade related jobs.

Tip 8) Look at my top rated tools page to get yourself set up with some good tools for the job.

Tip 9) Build up a rapport with the local builders merchants they can give you good deals on materials for your project.

Tip 10) Construction work is dangerous so be aware all the time and I would personally recommend staying away from working at height and especially working off a ladder. For this type of work employ a professional.

Tip 11) Don’t give up as soon as something goes wrong keep trying. The builders mentality is everything can be gotten over one way or the other, the fun bit is finding out how.

Tip 12) Building work is very strenuous make sure you lift things correctly and don’t overdo it at the start. It will take time for you to get use to the physical side of it. Don’t think because you go to the gym that it will be easy, it is a completely different workout. Going to the gym for an hour and Digging and barrowing mud into the skip for 9 hours a day, day after day is no comparison and it will test you physically and mentally and take time to get used to.

Tip 13) Following on from tip 12, cancel your gym membership it won’t be needed anymore.

Tip 14) Remember the 5 P’s Proper Planning Prevents Poor Performance. Plan what you are going to do and require well before you start the job. It’s the construction game so you will probably come up against something, but if the bulk of it is there and you have planned well it will save a lot of hassle and time as the job progresses.

Tip 15) Get to know other trades, chance is you will come up against something where you will definitely need professional help on. Keep a list of useful contacts so if the worst happens you have a list to hand of trades you can call at a moment’s notice.Tip 16) Don’t let people worry you, you will always have those acquaintances that worry about everything and in turn make you worry about what you are doing. Unless they have a proven track record or a trade back ground then what do they know? Get advice from a professional and crack on. Like I said earlier “A good builder can overcome anything” and that’s how you will learn.

Tip 17) Have a plan and don’t deviate too much, as soon as you start changing your mind during a project that is when the budget and time scale go out the window. Try and stick to the original plan and don’t get too focused on minor details.

 Tip 18) My old step dad was a carpenter he didn’t give me much advice because to be honest I don’t think he had much advice to give. But the two bits he did that have always stuck and which has helped me in my business were:

– Measure twice cut once

-Always clean up after yourself

So two tips for one there.

 Tip 19) Don’t keep your phone in your pocket. I have broken 2 already by heaving something up into the van or onto a scaffold and pressing it against the phone in my pocket. Also if you are anything like me it’s always going off and distracts you from the task at hand.

Tip 20) Building work is really hard physically and challenging mentally. On those long hot days when you have 4 ton of aggregate to take around the back garden or 3 packs of slabs or 1000 bricks to move by hand. It’s easy to get overwhelmed. My tip is to break the job down into smaller tasks and set little goals. So for example I may say “I’ll load 200 bricks first then I’ll stop for a drink” or “I’ll empty one dumpy bag of aggregate before I stop for some food” and so on. By setting these small goals throughout the day even the most physically demanding job can fly by and believe me I have had to do this many times myself over the years and when it’s your full time job, its day in day out so then this system is really needed.

 Tip 21) This is more of a self-improvement tip, but if I have jobs where I’m just loading a job up all day or the really mundane side of the build is happening then I get my audio books on and listen to them as I carry out the task. Obviously this has to be a safe environment to do this so not on a large construction site where there are heavy machinery driving around the place. But if it’s safe to do so listen to a business audio or self-improvement book or even learn a language. It’s a really good use of time and it keeps you entertained all the while educating yourself in some shape or form.

 If you are interested in the knowing what sort of business/motivational audio books I can recommend then comment on this post and I will give you some advice on where to start.

 Tip 22) Sketch the job out onto a pad of paper, so if a fence or patio you are deciding to build, draw it as it will look with all the measurements. This will help you to work out what materials are needed and give you an idea of the finished product. It may also highlight potential problems that you might not of spotted if you hadn’t of drawn it out. Every time I see a job now I sketch it this way and take down all the measurements. I also take photos of the area so I can refer back to it when I am pricing the works.


I hope these construction tips for beginners will guide you on your next project..

Squeaky floorboard causes

Squeaky floors due to bad plumbing

I’ve spent a few days trying to sort out a problem in my property which is squeaky flooring. It’s been a real problem when trying to settle our 14 month old. I would finally after an hour of trying get her to fall asleep and as I go to leave the room the floorboards make a massive noise and I have to start all over again trying to put her down.

Now you would think this is just a simple task bang a couple nails in and that will solve it. But DON’T DO THAT…

I went to carry out a job for a customer who had really squeaky floorboards and they were even bowing in places, rather than just nail the boards down I took them up to see what was happening and in the end I’m glad I did.

Whoever had laid the pipe for the heating system decided to lay 6 pipes side beside, a few of them being 22mm the whole length of the room and these where just notched in top of the floor joist so a fixing was not possible.

When the carpenters came in to lay the floor  these boards where just left loose with about 3 really bad fixings over a 4m span needless to say they move squeaked the whole chi -bang.


It’s always going to be hard to really sort this type of floor out without taking it all up and starting again, but in this case I was able to take out that particular section and as it was being carpeted install different size boards completely spanning over the said pipe work curing the problem.


But going back to my problem floor it started when I had the boiler changed from the old gravity fed system to a combi-boiler. As it was just a boiler change all the existing pipework stayed in-situ and just the bits around the boiler changed now it’s a known problem for the old pipework to weep as its gone from minimal pressure to a sealed system which maintains 2 bar of water pressure.

I have never seen it happen before my house but it happened to me and when I noticed the drips coming through the ceiling I took immediate action, I cut up the chipboard flooring first floor, with my multi tool(see tool reviews) I did it all properly marked on the blade the depth of the board and started cutting, it went straight through the pipe.

The drip then became a gush, before I could get the rest of the board up and access the pipe the contents of my central heating system was everywhere.

So it happens to the best of us believe me.

When I had cleared up I took stock of the situation and its was plain to see what happened apart from where I had cut the pipe open, the original plumber when the house was built laid a 15mm copper pipe on top of the supporting RSJ with no packing so over the years with foot traffic in that area being particularly high the pipe had become flattened and by the looks of it had been leaking for a long time before I had the property. The final straw was asking it to take 2 bar of water pressure. I cut out the damaged section of pipe work but unfortunately couldn’t move it anywhere else so it had to take the same route the only difference being that I packed either side of the pipe meaning the floor boards would not rest on it at all.

After an eventful day the boards where put back, more laid back and left for 12 months before I finally got around to sorting the floor out properly.

The boards where laid with chipboard flooring sheets so I had to replace it in sections but to do this I would need to cut them back to the joists to cut new boards in. It was easier said than done as the joist either side where in the other rooms so instead I had to make up new timber work to fit the new boards on.

The best way to do this is to fit noggins in between the existing joists, this takes the bulk of the weight then if you want to be able to get a few more fixings in then I fit a batten to the underside of the existing floor that you’re going up against then you have a fixing pint for your new floor and this helps prevent any sponginess..

Finally now that the new carpet has gone down its all looking good, what is always a good idea though is mark the location of the pipe on the floor as you are laying the new flooring down this will hopefully prevent and occurrence of what happened to me.

So morale of the storey if you have a squeak don’t go guns blazing and use that Makita impact driver to drive a screw in as you don’t know what surprises are waiting for you under the floorboards.

Winter property maintenance jobs to check/carry out

Property maintenance

This time of year the general exterior of the property needs look at.

I would start with gutters and down pipes, make sure all the gutters are clear of debris’ and that the downpipes flow properly.

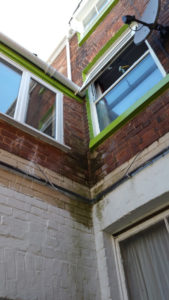
I have just come of a job where this was not checked for years and the state of the walls internally where shocking. It was an older property so it was what we call solid walls or 9” walls. This means there is no cavity so over time with this massive amount of water penetrating through the brick the damage to the inside can get really bad.

A good indicator of overflowing gutters/downpipes in that on the wall directly below the overflowing section there will be a build up of green algae and in extreme cases plant growth will be apparent.

Again I can’t stress enough that just by annually checking the gutters and down pipes it will really keep repair works to a minimum. It’s a cause of damp and mould growth and worst case the wall will need to be completely stripped back to the bare wall, dried out then re-boarded and plastered costing a lot of money. If you’re not happy getting up a ladder yourself there are people now that offer such services and for less than £100 for a standard terrace house  you could get the gutters checked and cleaned out, well worth the cost.

Windows

Windows are usually overlooked. PVC windows have a life span of about 10 years, you could easily extend this by keeping the windows clean inside and out and keeping the window hinges lubricated with 3 in  1 oil. This prolongs the life of the window dramatically, also on the opening part of the window keep the seals lubricated, to do this it’s simply a case of buying a pot of Vaseline and rubbing a small coating over the seals. This stops the rubber drying out increasing the life span and helps maintain the seal.

Timber windows ensure all the paint work is looking solid (no flakes or cracks) if there is fill any cracks with a 2 part exterior filler, scrape of any flakes and paint over at least 2 coats.. Now I swear by Sadolin superdec  exterior wood paint, it almost gives the timber a plastic coating and makes even rough looking timber look good, and really helps protect the timber from the elements.


Roof

It sounds obvious but no one generally does it, but look up and check out your roof, make sure there are no missing tiles even if you haven’t noticed any problem inside doesn’t mean the water isn’t slowly making its way in and eventually this will cause big problems, if there is slipped or missing tiles instruct a local builder/roofer to check it out.

Also look at the chimney, do you notice plants growing out or anything looking cracked and broken. If so get a price to sort it out (look at my article choosing a builder).

Usually if there’s a problem with the chimney tell signs internally are staining around the chimney breast. But even if there are no sign internally it doesn’t mean it doesn’t need sorting, it may be its one storm away from making its way in.


Exterior walls

Poor wall condition can cause lots of problems, damp ingress, mould, flaking paint, water staining and so on.

Even if you have cavity walls water can still work its way through. Usually in cavities debris falls down bridging the cavity and connecting the internal and external wall which is a good path for water to travel.

Insure pointing in is in good condition and there are no missing bricks or obvious holes(from pipework etc.  If it all looks in fairly good condition there is a product that helps protect the brickwork and makes it more waterproof. These products are great as they stop brickwork becoming saturated and allow water to run off more freely. There are lots of products available, Thomson water seal is a known one and this is painted on with a brush. However now there are some more environmentally friendly versions and these products also let the building breath, whereas the other products just seal it all in.

Look on my products page for these products mentioned and more information.